
Transforming your garden into a vibrant, green space doesn’t have to cost a fortune or deplete natural resources. With a sprinkle of creativity and a dash of ingenuity, you can craft stunning DIY planter ideas using recycled materials, turning ordinary objects into charming garden accents. Whether you’re seeking inexpensive solutions or eco-friendly alternatives, this guide explores how to repurpose everyday items into functional and aesthetically pleasing planters. From repurposing old containers to discovering budget-friendly finds at stores like Dollar Tree, we’ll delve into practical tips and innovative ideas that elevate your gardening space without breaking the bank. Learn how to maximize drainage, protect wood from rotting, and explore unique ways to line your planters for long-lasting success. Embrace the joy of gardening with these affordable and sustainable DIY planter ideas, perfect for small spaces and big impacts.
Key Takeaways
– Top Materials for Lining Planters: Opt for plastic sheeting or pond liner for their durability, affordability, and effectiveness in preventing water loss.
– Protecting Wooden Planters: Always prepare wood by cleaning and drying it, then apply protective sealants or preservatives. Use metal or plastic inserts to add support and prevent warping.
– Choosing the Right Liner: Select plastic, rubber, or metal based on your priorities—durability, cost, aesthetics, and soil type. Consider burlap cloth for eco-friendly options.
Low-Cost Solutions for Planters
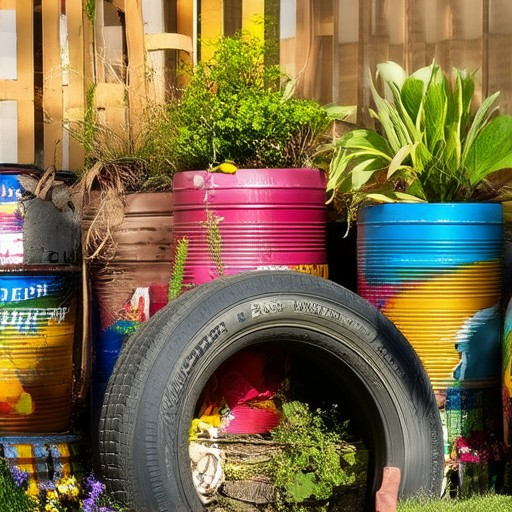
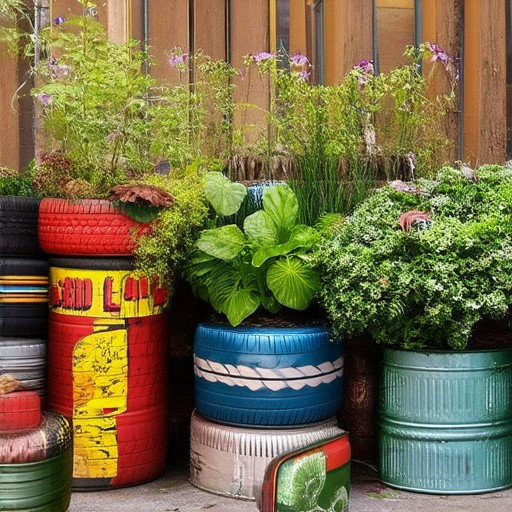
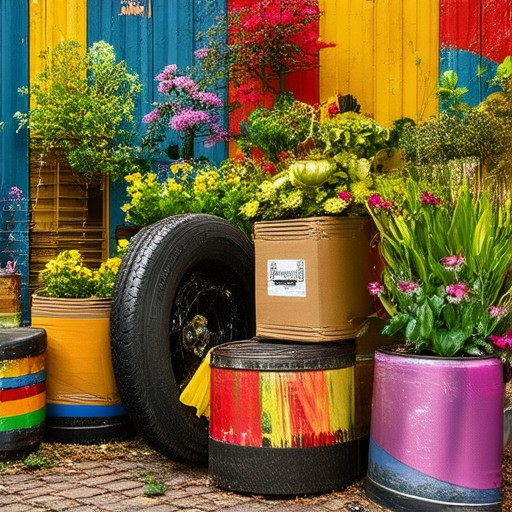
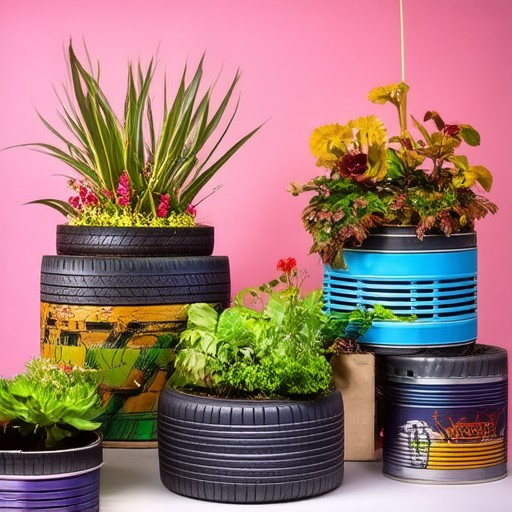
- Old Tires : Repurpose discarded tires by cutting them open and placing them upright. They provide sturdy, deep containers perfect for larger plants. Look for tires at local scrapyards or recycling centers.
- Milk Jugs : Clean and sterilize used milk jugs. Drill holes in the bottom for drainage and place them in sunny spots. Handle them carefully to avoid tipping.
- Plastic Bottles : Use large plastic bottles, such as soda bottles. Clean them thoroughly and add drainage holes. Place them on windowsills or patios for maximum sun exposure.
- Cardboard Boxes : Cut down larger boxes to size and reinforce weak spots with tape or wood. Line them with plastic sheeting to prevent soil from absorbing too much moisture.
- Old Wooden Crates : Find crates at local hardware stores or online marketplaces. Sand them to remove splinters and drill holes for watering. Ideal for taller plants.
- Metal Cans : Recycle food cans from grocery stores. Clean them and add drainage holes. These are durable and great for smaller plants.
- Used Pots : Reuse pots from previous plants. Check for existing drainage holes and ensure they’re clean before refilling with soil.
Where to Find Materials: Explore local thrift stores, dollar stores, garden centers, or online platforms like eBay and Facebook Marketplace for affordable options. Combine these ideas to create unique, budget-friendly planters tailored to your needs.
Does Dollar Tree Sell Plant Pots?
Yes, Dollar Tree sells plant pots. As part of their garden and outdoor decor section, they offer a variety of plant pots designed for different purposes. Whether you’re looking for terracotta pots for herbs and small plants or larger pots for bigger plants and seasonal decorations, Dollar Tree has options that fit your needs. Their selection is meant to provide affordable solutions for anyone looking to enhance their green spaces.
Dollar Tree’s plant pots are typically available in sizes that cater to different preferences, making them versatile for various gardening projects. They may also carry related items like soil or plant stands, which can complete your gardening setup.
Do I Need to Put Rocks in the Bottom of a Planter?
Adding rocks to the bottom of a planter can be beneficial, but it depends on several factors:
- Drainage Improvement: Rocks can help improve drainage, especially in containers without built-in drainage holes, preventing water from pooling and reducing the risk of root rot.
- Aeration Enhancement: Small rocks or gravel can increase airflow, promoting healthier root growth.
- Container Stability: In some cases, rocks can provide extra weight support, though this is less common.
Considerations:
- Use smooth, non-sharp rocks to avoid damaging roots.
- Opt for smaller rocks or gravel to maintain flexibility and prevent blocking drainage holes.
- Evaluate your plant’s needs; rocks may not be necessary if the planter has good drainage or if the soil is well-aerated.
Placement Tip:
- Arrange rocks evenly around the edges or in layers to facilitate proper water distribution.
Ultimately, rocks are optional and depend on your specific setup and plant requirements.
Best Material for Lining a Planter Box
When choosing the best material to line a planter box, it’s essential to consider factors such as durability, water retention, and ease of installation. Here are the top materials recommended:
- Plastic Sheeting : A popular choice due to its flexibility and waterproof properties. Pond liners, in particular, are thick and can be easily shaped to fit most planter sizes, reducing water evaporation.
- Rubber Lining : Offers excellent durability and flexibility, though it may be more expensive. It provides long-term protection and is relatively easy to install.
- Newspaper or Cardboard : An eco-friendly option that is lightweight and affordable. However, it may not last long and could become moldy if not properly sealed.
- Polyethylene or Vinyl Liners : Known for their puncture resistance and longevity. These materials are thicker, which may increase the weight of the planter but offer better protection against weeds and moisture.
- Burlap Cloth : While heavy and somewhat absorbent, it is biodegradable. However, it may retain too much moisture, making it less ideal for some applications.
For most gardeners, plastic sheeting or pond liner are the top choices due to their balance of cost-effectiveness, durability, and ease of use. If seeking a more sustainable option, burlap cloth can be considered, though it may not be as effective in preventing water loss.
How to Keep Wood from Rotting in a Planter
To prevent wood from rotting in a planter, follow these essential steps:
- 1. Prepare the Wood: Clean the wood thoroughly and allow it to dry completely. Sanding the surface can remove impurities and improve the absorption of sealants.
- 2. Apply a Protective Sealant: Use a high-quality wood sealant or preservative like linseed oil or beeswax to coat the wood. This creates a barrier against moisture and decay.
- 3. Use a Preservative Treatment: Consider treating the wood with a commercial wood preservative. This offers stronger protection against fungal growth compared to sealants alone.
- 4. Elevate the Planter: Place the planter on bricks or blocks to prevent moisture buildup from the ground. This allows air circulation and reduces humidity around the base.
- 5. Install Metal or Plastic Inserts: Add supports or inserts to distribute weight evenly and prevent warping. This also enhances structural integrity and reduces pressure on the wood.
- 6. Line the Interior: Use a waterproof liner to create a barrier between the wood and soil. This helps redirect water flow and prevents direct contact with moist soil.
- 7. Regularly Inspect the Planter: Check the wood periodically for signs of discoloration or softening. Address issues promptly to prevent further rot.
- 8. Apply Water Repellent Spray: Use a water repellent spray to refresh the wood’s protection. Reapply as needed, especially after heavy rainfall or watering.
By combining these methods, you can effectively protect your wooden planter from rotting and extend its lifespan. Remember to maintain regular inspections and apply treatments as needed for optimal results.
Should I Line a Wooden Planter with Plastic?
When deciding whether to line a wooden planter with plastic, consider several factors to determine the best choice for your needs:
- Material Options: – Plastic Liner: Durable, flexible, and widely available. It prevents moisture damage and allows for drainage. Choose a thickness suitable for your planter’s size and soil type. – Rubber Sheet: Offers durability and flexibility, ideal for fitting around edges. Consider its weight and moisture-trapping properties. – Metal Liner: Sturdy but may rust over time. Suitable for exposed environments but could conduct heat, potentially harming plant roots.
- Considerations:** – Durability vs. Cost: Plastic is affordable but may need frequent replacement. Rubber or metal offer longevity but come with higher initial costs. – Environmental Impact: Opt for biodegradable materials if possible to minimize ecological footprint. – Installation Ease: Most liners can be installed by removing the bottom, sliding on the liner, and replacing the planter. Check for compatibility and required cuts.
- Aesthetic Preferences: – Transparent or semi-transparent liners keep the planter’s design visible. – Colored liners can complement your decor.
- Planter Material and Treatment: – Use a liner if the wood is prone to moisture damage or warping. Treated woods may have inherent resistance, reducing the need for a liner.
- Soil Type and Maintenance: – Lightweight soils may function well with a thin plastic liner. – Heavy or shifting soils may benefit from sturdier options like rubber or metal.
Choose the liner based on your priorities: affordability, durability, aesthetics, and environmental impact. For a quick, cost-effective solution, plastic is ideal. For a more lasting option, consider rubber or metal, aligning with your specific needs and budget.


0 Comments