
Transforming a space into a vibrant, personalized haven can be achieved through simple yet impactful changes. One such creative approach is incorporating DIY art wall decor, a budget-friendly method that turns plain walls into unique visual statements. Whether you’re a seasoned DIY enthusiast or new to crafting, DIY art offers a cost-effective way to infuse your space with personality and style. With minimal supplies and endless possibilities, you can create wall art that reflects your taste, whether it’s through painting, repurposing household items, or experimenting with fiber art. In this guide, we’ll explore easy-to-follow techniques, materials, and tips to help you elevate your home decor effortlessly.
Key Takeaways
- Transform affordable wall art into a high-end look with high-quality framing, strategic lighting, neutral mats, and thoughtful color coordination.
- Prioritize these elements: use a floating mount for a modern feel, hang artwork at eye level, and pair it with dark walls or a cohesive decor style.
- Create professional-looking art without breaking the bank using crayola markers, prismacolor pencils, watercolor paints, and acrylics.
- Get creative with household items and experiment with different materials to enhance your artistic skills.
- Medium-sized wall art (16×20 to 18×24 inches) is a versatile and popular choice, balancing cost and impact in most spaces.
- Consider factors like space, art style, purpose, and budget when choosing wall art size, but let personal preference guide your decision.
How to Decorate Walls Cheaply
To transform your walls without repainting, try these cost-effective methods:
- Wallpaper : Choose affordable, removable wallpaper for a quick update. Many options are peel-and-stick, making installation easy and reversible.
- Decals and Stickers : Add personality with vinyl wall decals or decorative stickers. These are often reusable and won’t damage the wall surface.
- Fabric Hangings : Drapery or fabric wall hangings can add texture and color. Use command strips or hooks to mount them temporarily.
- Wall Panels : Install decorative wall panels or molding to create a more intricate look without full repainting.
- Art and Mirrors : Frame artwork or large-format photos and mount them using picture hooks. Mirrors can reflect light and add a reflective touch.
- Textured Coverings : Apply wall textures or faux finishes for a more dramatic effect. These can be applied with brushes or sponges for a professional look.
For more DIY project ideas, visit the Pravylo Project and explore their collection of creative wall decor tutorials and guides.
How Can I Decorate My Wall DIY?
To decorate your wall DIY-style, consider these creative approaches:
- Wall Art and Paintings: Create your own masterpiece or frame your favorite artwork. Use acrylic paints, spray paint, or oil paints for a personalized touch. Consider stencils or transfer paper for intricate designs.
- Decals and Stickers: Add removable decorative elements like quotes, patterns, or seasonal motifs. These are easy to apply and can be changed as needed.
- Mural Ideas: Transform your wall into a larger-scale artwork. Use paint or wallpaper to create a cohesive design that tells a story or reflects your personality.
- Photo Frames: Arrange frames in different sizes and shapes for an eclectic look. Mix and match styles to add visual interest to your space.
- DIY Wall Panels: Use wood, metal, or plastic panels to create decorative features. Paint or distress them for a unique texture and finish.
- String Art or Wall Sculptures: Hang strings, ropes, or twine in creative patterns. Add beads, lights, or other materials for a dimensional effect.
- Geometric Shapes: Use tape, paper, or paint to create geometric patterns. This approach works well for modern or minimalist spaces.
- Chalkboard or Blackboard: Turn a wall into a functional chalkboard for notes, schedules, or creative expressions. Paint it with chalkboard-friendly paint.
- Planters or Herb Gardens: Install vertical planters or herb gardens for a green touch. Use recycled materials or wooden boxes for a eco-friendly approach.
Tools and Materials Needed:
- Paint or paintbrushes
- Paint rollers
- Stencils or transfer sheets
- Decals or adhesive-backed stickers
- Frame materials
- Wood, metal, or plastic panels
- String, rope, or twine
- Chalkboard paint
- Plants or seeds
Steps to Get Started:
- Plan your design and choose your materials.
- Prepare the wall surface by cleaning and sanding if necessary.
- Apply primers or base coats to ensure adhesion.
- Start painting or assembling your pieces according to your design.
- Hang or attach your creations securely.
For more DIY ideas and step-by-step tutorials, visit our DIY Projects section. Explore various wall decoration techniques and discover your creative potential!
Rule of Wall Decor
The rule of wall decor involves understanding how to effectively hang artwork and decorative pieces in a room. This ensures balance and visual appeal while maximizing the space’s potential.
Key Guidelines
- The 2/3rds Rule: As a general guideline, artwork should occupy approximately two-thirds of the wall space above furniture. This creates a visually pleasing arrangement without overwhelming the space.
- Balance Asymmetry: Mix symmetric and asymmetric elements to add interest. A balanced composition can include a combination of framed pieces, decorative items, and functional elements like mirrors or clocks.
- Space Appropriately: Leave enough space between pieces to avoid a cramped look. A minimum of 2-6 inches between frames or decorative items is recommended for most rooms.
- Proportion Matters: Consider the size of your walls and the pieces you wish to display. Larger artwork suits bigger walls, while smaller pieces work well in compact spaces.
- Themed Displays: Create a cohesive theme by selecting artwork and decor that complements each other in color, style, and subject matter.
- Touchpoints: Ensure that decorative elements align with the room’s layout, lighting, and overall aesthetic to create harmony.
Practical Tips
- Measure the wall space accurately before hanging anything to ensure proper placement.
- Choose high-quality frames or display cases that complement the artwork and decor.
- Hang artwork at eye level (typically 57-60 inches from the floor) for maximum impact.
- Group similar-sized pieces together for a polished look.
- Use command strips or hooks for easy installation without damaging the walls.
By following these principles, you can transform any room into a visually stunning space that feels balanced and purposeful.
How to Make Cheap Wall Art Look Expensive
To transform affordable wall art into something that appears high-end, focus on these key strategies:
- Framing:** Choose a high-quality frame with intricate details, metallic finishes, or gilded edges. A statement frame can instantly elevate the piece.
- Lighting:** Use ambient lighting such as table lamps or wall-mounted fixtures to highlight the artwork. Natural light can also enhance its visual appeal.
- Matting:** Add a professional touch with a high-quality mat. Neutral tones like black or white often complement most artwork effectively.
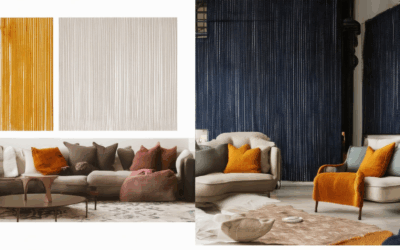
- Color Coordination:** Pair the artwork with dark-colored walls to make it stand out. Lighter walls may also work well depending on the color scheme of the piece.
- Mounting:** Consider a floating mount for a modern, polished look or opt for a traditional frame with hooks for a classic display.
- Hanging Height:** Ensure the artwork is hung at eye level for a more intentional and sophisticated presentation.
- Display Context:** Group similar pieces together to create a curated gallery effect, which suggests a more expensive and thoughtfully assembled collection.
- Setting:** Place the artwork in a room with a cohesive decor style, such as a formal living room or dining area, to enhance its upscale appearance.
Do you need expensive art supplies to make good art?
No, you don’t need expensive art supplies to create good art. The quality of your artwork depends more on your skill, creativity, and dedication than the cost of the materials you use. Many successful artists have started with basic tools and evolved their techniques over time.
Affordable Art Supplies Can Work Wonders
There are plenty of budget-friendly options that can help you create professional-looking pieces. For example:
- Crayola Markers and Colored Pencils: These are widely available and great for creating vibrant, bold artwork. They’re perfect for beginners and can be used for everything from sketches to full paintings.
- Prismacolor Pencils: Known for their rich colors and smooth application, these are a favorite among many artists, even though they might be slightly more expensive than Crayola.
- Watercolor Paints: Affordable sets are available that offer a wide range of colors. These are excellent for water-based techniques and can be used for everything from landscapes to abstract art.
- Acrylic Paints: These are versatile and can be used for both canvas and mixed media projects. There are even student-grade acrylics that are very inexpensive.
Resourcefulness is Key
Don’t underestimate the power of household items! Many artists have created stunning works using everyday objects like coffee cups, cardboard, or even paper plates. Get creative with what you already have around the house.
Practice and Experimentation
The more you experiment with different materials, the better you’ll become at using them effectively. Start with what you have, and gradually invest in higher-quality tools as your skills grow.
Join the Pravylo Project Community
Ready to take your art to the next level? Explore DIY art projects and art tutorials on the Pravylo Project. Discover new techniques, meet fellow creators, and share your progress with a supportive community.
Learn More About Art Materials
Want to know more about the best art supplies for different mediums? Check out our guide on the best art supplies and find out which ones suit your style and budget.
Remember, the most important thing is to stay inspired and keep creating. Whether you’re using high-end tools or household items, your unique perspective will shine through in your artwork!

What Size Wall Art Sells Best?
The ideal size of wall art can vary depending on several factors, including personal taste, available space, and intended aesthetic impact. However, medium-sized wall art, typically measuring between 16 inches by 20 inches and 18 inches by 24 inches, tends to be a popular choice due to its versatility and ability to complement a wide range of interior designs.
Key Considerations:
- Space and Proportion : Medium-sized wall art fits well in most rooms, making it a practical choice for many homeowners. Larger pieces may overwhelm smaller spaces, while smaller sizes may lack visual impact in larger areas.
- Art Style : Abstract and minimalist art often benefits from larger formats, as they can dominate a space and create a bold statement. Landscape and portrait art may be more effective in medium to large sizes to maintain detail without overwhelming the viewer.
- Purpose : Wall art serves various purposes, such as decoration, statement-making, or covering empty wall space. Depending on the intended use, sizes can range from small (8×10 inches) for subtle accents to extra-large (36×48 inches) for dramatic effect.
- Framing and Display : The size of the frame relative to the artwork can also influence perceived size. A smaller painting with a larger frame may appear more imposing than its actual dimensions.
- Trends and Preferences : Current trends in home decor can influence popularity. For example, minimalistic designs might lean toward smaller, simpler pieces, while abstract art could push boundaries with larger formats.
- Budget Constraints : Larger wall art often commands higher prices, which may limit purchasing power. Medium sizes strike a balance between cost and impact, making them a financially viable option for many buyers.
Conclusion:
While medium-sized wall art is a safe and popular choice, the best size ultimately depends on individual preferences, space availability, and the desired aesthetic outcome. Offering a variety of sizes ensures that every homeowner can find something that suits their needs and enhances their space.


0 Comments